NZXT H5 Flow Manual: A Comprehensive Guide
This manual provides detailed instructions for building a PC within the NZXT H5 Flow case, covering everything from component installation to cable management and cooling.
The NZXT H5 Flow is a mid-tower case designed for optimal airflow and ease of building. It’s a popular choice for both first-time builders and experienced PC enthusiasts, offering a balance of features, aesthetics, and affordability. This case prioritizes efficient cooling with a perforated front panel, maximizing intake for fans and radiators.
This guide will walk you through every step of the building process, from unboxing and component installation to cable management and system configuration. Whether you’re assembling a gaming rig, a workstation, or a general-purpose PC, the H5 Flow provides a solid foundation. We’ll cover essential details, ensuring a smooth and successful build experience. Prepare to unlock the full potential of your components within this versatile chassis!
Unboxing and Component Inventory
Upon receiving your NZXT H5 Flow, carefully inspect the box for any signs of damage during shipping. Once opened, verify the contents against the included inventory list. You should find the H5 Flow case itself, a user manual, a hardware kit containing screws, standoffs, and cable ties, and potentially some NZXT branding elements.
The hardware kit is crucial; ensure all components are present – various screw types for motherboard, storage, and fans, plus standoffs for different motherboard form factors. Missing parts can halt your build, so a thorough check is vital. Familiarize yourself with each component before proceeding. Retain the packaging for potential warranty claims or returns. A complete inventory sets the stage for a hassle-free build!
Case Specifications and Dimensions
The NZXT H5 Flow is a mid-tower case designed for optimal airflow and ease of building. Its dimensions are approximately 370mm (H) x 210mm (W) x 425mm (D), accommodating standard ATX, Micro-ATX, and Mini-ITX motherboards. The case supports graphics cards up to 365mm in length and CPU coolers with a maximum height of 165mm.
Expansion slots include seven PCIe slots, allowing for multiple GPUs or expansion cards. It features drive bays for multiple 2.5” SSDs and 3.5” HDDs; The front panel includes USB 3.0 and USB-C ports, alongside audio jacks. Understanding these specifications is crucial for ensuring component compatibility before starting your build, preventing potential issues during assembly.

Building with the NZXT H5 Flow
Begin your build by carefully preparing the case and gathering necessary tools. This section details the process of installing core components within the H5 Flow.
Motherboard Installation
Preparing for motherboard installation is crucial for a smooth build. First, locate the motherboard standoffs pre-installed within the NZXT H5 Flow. Ensure they align with your motherboard’s mounting holes – additional standoffs may be needed depending on your motherboard’s form factor (ATX, Micro-ATX, Mini-ITX).
Carefully lower the motherboard onto the standoffs, aligning the rear I/O shield with the case’s opening. Secure the motherboard using screws, tightening them gently to avoid damaging the board or standoffs. Double-check that all screws are fastened before proceeding. Proper alignment and secure mounting are essential for stability and preventing short circuits during operation. Take your time and verify each step!
CPU Cooler Installation (Air & AIO)
Installing a CPU cooler, whether air-cooled or an All-in-One (AIO) liquid cooler, requires precision. For air coolers, install the appropriate mounting bracket onto the motherboard, following the cooler’s instructions. Apply thermal paste to the CPU’s integrated heat spreader (IHS) and carefully seat the cooler, securing it with the retention mechanism.
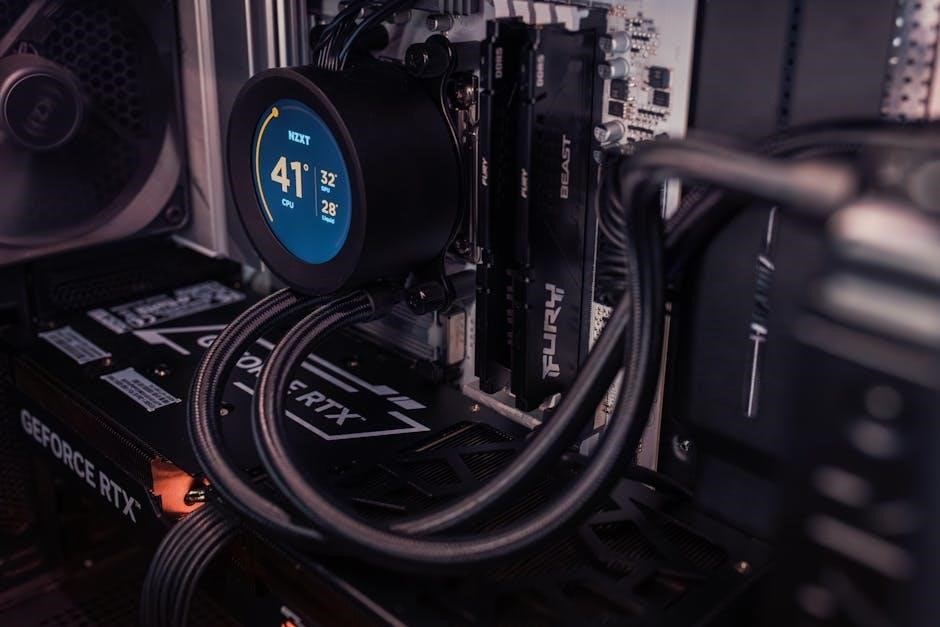
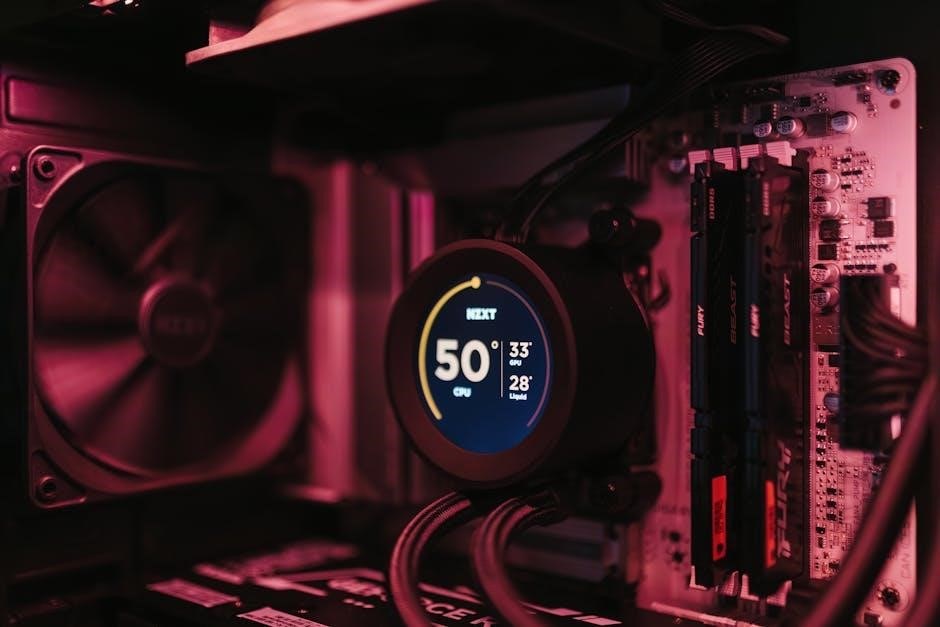
For AIO coolers, mount the radiator to the case – the H5 Flow offers multiple mounting locations. Connect the pump to the CPU and secure the radiator fans. Ensure proper hose routing to avoid kinks and interference. Double-check all connections before powering on the system. Proper cooler installation is vital for maintaining optimal CPU temperatures and preventing thermal throttling.
RAM Installation
Installing RAM modules into the NZXT H5 Flow is a straightforward process, but requires attention to detail. First, locate the RAM slots on the motherboard – typically color-coded for dual-channel configuration. Open the retaining clips on both ends of the slots. Align the notch on the RAM module with the notch in the slot, ensuring correct orientation.
Apply firm, even pressure to both ends of the module until it clicks into place and the retaining clips automatically close. For dual-channel operation, consult your motherboard manual to determine the correct slots to use. Incorrect installation can prevent the system from booting, so double-check that the modules are securely seated.
GPU Installation
Installing your graphics card (GPU) into the NZXT H5 Flow requires removing the appropriate rear case slot covers. Locate the top-most PCIe x16 slot on the motherboard – this is where the GPU will connect. Carefully align the GPU’s connector with the slot and apply firm, even pressure until it clicks securely into place. Ensure the retaining clip on the PCIe slot engages.
Screw the GPU bracket to the case for added stability. Verify that the GPU is firmly seated and doesn’t wobble. Proper installation is crucial for optimal performance and preventing damage. Connect the necessary power cables from the PSU to the GPU, referencing your GPU’s documentation for specific requirements.

Storage and Drive Bays
The NZXT H5 Flow offers versatile storage options, supporting both 2.5″ SSDs, 3.5″ HDDs, and M.2 SSDs for diverse system configurations.
Installing 2.5″ SSDs
The NZXT H5 Flow provides multiple locations for installing 2.5″ Solid State Drives (SSDs). Typically, these locations are found behind the motherboard tray and within dedicated SSD mounting brackets. Begin by identifying a suitable mounting point within the case. Align the SSD with the screw holes in the bracket, ensuring the SATA and power connectors are accessible.
Secure the SSD using the provided screws – do not overtighten. Connect a SATA data cable from the SSD to an available SATA port on the motherboard. Finally, connect a SATA power cable from the power supply to the SSD. Double-check all connections before proceeding to ensure a stable and reliable connection for optimal performance.
Installing 3.5″ HDDs
The NZXT H5 Flow case features dedicated bays for installing 3.5″ Hard Disk Drives (HDDs). Locate these bays, usually at the bottom or front of the case. Slide the HDD into the bay, aligning the mounting holes. Secure the drive using screws – ensure they are properly tightened, but avoid over-tightening to prevent damage.
Connect a SATA data cable from the HDD to an available SATA port on the motherboard. Then, connect a SATA power cable from the power supply to the HDD. Verify all connections are secure before powering on the system. Proper installation ensures stable operation and optimal data transfer speeds for your storage needs.
M.2 SSD Installation
The NZXT H5 Flow supports M.2 Solid State Drives (SSDs), offering incredibly fast storage solutions. Locate the M.2 slot on the motherboard – consult your motherboard manual for its exact position. Carefully insert the M.2 SSD into the slot at a slight angle, then gently press it down until it clicks into place.
Secure the SSD with the provided M.2 screw. Do not overtighten! M.2 drives often require a heatsink for optimal thermal performance; install one if included with your drive or motherboard. Ensure proper seating and secure fastening for reliable, high-speed data access. This installation significantly boosts system responsiveness.

Cable Management in the H5 Flow
Effective cable management is crucial for airflow and aesthetics. The H5 Flow offers ample space and routing options behind the motherboard tray for a clean build.
Routing Cables Behind the Motherboard Tray
The NZXT H5 Flow excels in cable management, primarily due to the generous space behind the motherboard tray. This area allows you to conceal most cables, improving airflow and the overall appearance of your build. Begin by routing the larger cables, such as the 24-pin ATX and 8-pin EPS cables, along the designated channels.
Utilize the pre-cut cable routing holes to pass cables through to their respective components. Secure cables with zip ties or Velcro straps to keep them organized and prevent them from obstructing fans or airflow paths. Pay attention to the power supply cables, ensuring they are neatly tucked away. Prioritize routing cables away from critical components like the CPU cooler and graphics card to maximize cooling efficiency. A well-managed cable setup contributes significantly to a cleaner, more efficient, and visually appealing PC build within the H5 Flow.
Using Cable Ties and Velcro Straps
Effective cable management within the NZXT H5 Flow relies heavily on utilizing cable ties and Velcro straps. These tools are essential for securing and organizing cables behind the motherboard tray and within the case’s various compartments. Cable ties provide a firm hold, ideal for bundling larger groups of cables together, while Velcro straps offer flexibility and reusability.
Strategically place cable ties around bundled cables, avoiding excessive tightness that could damage the wires. Velcro straps are perfect for securing cables along the frame or to each other, allowing for easy adjustments during the build process. Focus on creating clean lines and minimizing cable clutter to optimize airflow and improve the aesthetic appeal of your system. Remember to leave some slack in the cables for easy component access and future upgrades.
Managing Front Panel Cables
Properly managing the front panel cables – power button, reset button, USB, and audio – is crucial for a clean build in the NZXT H5 Flow. These cables are typically located at the bottom of the case and require careful routing to avoid obstructing airflow or interfering with other components.
Begin by identifying each cable and its corresponding connector on the motherboard. Refer to your motherboard manual for precise locations. Route the cables along the designated pathways within the case, utilizing the cutouts and channels provided. Secure them with cable ties or Velcro straps to prevent them from dangling or obstructing airflow. Ensure the cables are long enough to reach their connections comfortably without being stretched or strained. A tidy arrangement of front panel cables contributes significantly to the overall aesthetic and functionality of your build.

Cooling System Configuration
Optimize thermal performance within the NZXT H5 Flow by strategically installing fans and radiators, ensuring efficient airflow for optimal component cooling.
Fan Installation and Placement
The NZXT H5 Flow offers versatile fan mounting locations to maximize airflow and cooling efficiency. Front panel supports up to two 140mm or three 120mm fans, ideal for intake. The top panel accommodates two 140mm or three 120mm fans for exhaust, or radiator mounting.
Rear panel supports a single 120mm fan, typically used for exhaust. Bottom panel allows for two 120mm fans with a dust filter, enhancing intake while protecting components. When installing fans, ensure the airflow direction matches your cooling strategy – intake fans draw cool air in, while exhaust fans expel hot air.
Consider using a balanced fan configuration for optimal performance. Pre-installed fans are often included, but upgrading to higher-quality fans can significantly improve cooling. Securely mount fans using the provided screws, ensuring they are firmly attached to the case.
Radiator Support and Installation
The NZXT H5 Flow is designed to accommodate various radiator sizes for effective liquid cooling. The top panel supports up to a 280mm radiator, providing ample space for cooling high-performance CPUs. Front panel installation is possible with a 280mm radiator, though it may require adjusting component placement.
When installing a radiator, ensure compatibility with your chosen liquid cooler and the case’s mounting points. Use the provided screws to securely attach the radiator to the case. Pay attention to fan orientation; fans should be positioned to either push or pull air through the radiator fins.
Proper tubing routing is crucial to prevent kinks and ensure optimal coolant flow. Consider the radiator’s thickness and fan depth to avoid clearance issues with other components. Double-check all connections for leaks before powering on the system.
Airflow Optimization
Maximizing airflow is critical for maintaining optimal temperatures within the NZXT H5 Flow. The case’s design prioritizes efficient cooling through strategically placed fan mounts and a perforated front panel. Positive pressure, where more air is drawn in than exhausted, minimizes dust buildup.
Install intake fans at the front and bottom to draw cool air into the case, and exhaust fans at the rear and top to expel hot air. Consider fan curves within your BIOS or using fan control software to adjust speeds based on component temperatures.
Cable management plays a vital role in airflow; neatly routed cables prevent obstruction. Regularly cleaning dust filters and internal components ensures continued cooling performance. Experiment with fan configurations to find the optimal balance between noise and temperature.
Front Panel I/O and Connectivity
The NZXT H5 Flow’s front panel offers USB ports and audio jacks for convenient connectivity, simplifying peripheral connections and audio device integration.
Understanding the Front Panel Connectors
The NZXT H5 Flow’s front panel connectors are crucial for linking case features to the motherboard. These include the power button, reset button, power LED, and HDD LED connectors. Careful attention to the motherboard manual is essential for correct pin alignment during connection.
USB 3.0 and USB 2.0 headers, along with the front panel audio connector (HD Audio or AC’97, depending on your motherboard), require precise placement. Incorrect connections can prevent these features from functioning. The H5 Flow’s connectors are generally labeled, but referencing both the case and motherboard documentation ensures a smooth setup. Proper connection guarantees functionality of all front panel components, enhancing the user experience.
USB Port Functionality
The NZXT H5 Flow front panel boasts USB 3.0 and USB 2.0 ports, offering versatile connectivity for peripherals. USB 3.0 provides significantly faster data transfer speeds compared to USB 2.0, ideal for external hard drives and high-speed devices. Ensure these ports are connected to the corresponding USB 3.0 headers on your motherboard to achieve optimal performance.
USB 2.0 ports remain useful for keyboards, mice, and other lower-bandwidth devices. Proper connection to the motherboard’s USB 2.0 headers is vital. The H5 Flow’s USB ports support a wide range of devices, enhancing system usability. Verify driver installation for full functionality, especially with newer devices, to guarantee seamless operation and data transfer capabilities.
Audio Jack Configuration
The NZXT H5 Flow’s front panel includes dedicated audio jacks for microphone and headphone connections, providing convenient access for audio peripherals. These jacks typically follow the standard color-coding: green for headphones/speakers, and pink for microphones. Ensure correct connection to your motherboard’s front panel audio header for proper functionality.
Proper configuration within your operating system is crucial for optimal audio performance. Select the correct input and output devices in your sound settings. High-definition audio (HD Audio) support is standard, offering superior sound quality. If experiencing issues, verify driver installation and compatibility with your audio devices. Correct jack configuration ensures clear communication and immersive audio experiences.

Power Supply Installation
Securely mount the PSU in the designated bay, ensuring proper alignment and utilizing the provided screws. Cable management is key for airflow and aesthetics.
PSU Placement and Mounting
The NZXT H5 Flow is designed to accommodate standard ATX power supplies. Locate the PSU bay at the bottom of the case, typically covered by a removable bracket. Before installation, ensure the PSU’s fan is oriented correctly – usually facing downwards to draw cool air from beneath the case.
Carefully slide the PSU into the bay, aligning the mounting holes with those in the case. Secure it using the provided screws; do not overtighten. A properly mounted PSU should sit flush with the case and feel stable. Double-check that no cables are pinched during installation. Proper PSU placement is crucial for optimal airflow and system cooling, contributing to overall stability and performance.
Cable Management for the PSU
Effective cable management is vital for airflow and aesthetics within the NZXT H5 Flow. Utilize the routing channels behind the motherboard tray to conceal PSU cables. Begin by connecting essential cables to the motherboard, GPU, and storage devices;
Excess cable length should be neatly coiled and secured using the provided Velcro straps or zip ties. Avoid obstructing fans or airflow paths. The H5 Flow offers ample space for tucking away cables, keeping the interior clean and organized. Prioritize routing cables along the edges of the case, maximizing space in the center. A well-managed PSU cable setup improves cooling and simplifies future upgrades.
Wattage Recommendations
Selecting the appropriate power supply wattage is crucial for system stability and future upgrades with the NZXT H5 Flow. A minimum of 550W is recommended for basic builds with a mid-range CPU and GPU. However, higher-end components demand more power.
For systems featuring a powerful graphics card and overclocked CPU, a 650W to 750W PSU is advisable. Consider future component additions, such as additional storage or a second GPU, when determining wattage. Always choose a PSU from a reputable brand with 80+ Bronze or Gold certification for efficiency and reliability. Overestimating wattage provides headroom and reduces strain on the PSU, extending its lifespan.