Brivis Wall Controller Manual: A Comprehensive Guide
Brivis systems, encompassing Profiler and Promina models (P23-P64), rely on robust control. The Networker NC-6 and electronic boards (N-E6, B021191) are key components.
Understanding Brivis Wall Controller Models
Brivis offers a diverse range of wall controller models designed to manage heating and cooling systems effectively. These controllers, integral to systems like the Networker NC-6, Profiler (P23 to P64), and Promina (P24 to P64) series, provide users with precise control over their indoor climate. Older models, while potentially lacking some modern features, remain functional and often supported with available documentation.
Understanding the specific model is crucial for troubleshooting and programming. Key identifiers include the model number (e.g., NC-6, P24) and part codes (like BSB022890). These numbers are typically found on the controller itself or associated documentation. The controllers manage zoning systems, often in conjunction with Brivis StarPro SP and BX5 models, allowing for customized temperature control in different areas of a home.
The functionality of these controllers extends to managing evaporative coolers and integrating with components like Fasco motors (80855BNVA-A12). Owners manuals detail button functions, display interpretations, and operational modes – manual or auto – essential for optimal system performance. Recognizing the controller model is the first step towards effective operation and maintenance.
Brivis Networker Controller NC-6: Specifications & Features
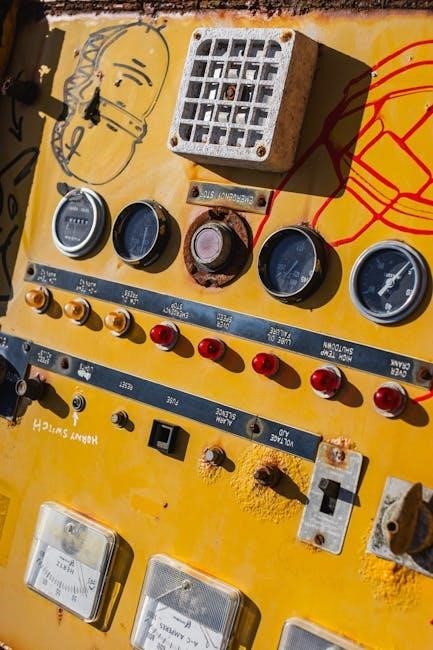
The Brivis Networker Controller NC-6 (product code: 1302541) is a central component in many Brivis heating and cooling systems. This wall-mounted controller facilitates programmable operation, offering both automatic and manual modes for user convenience. It’s designed to work seamlessly with Brivis wall switches and zoning systems, enhancing climate control throughout the home.
While specific detailed specifications regarding signal receiving range and operating environment aren’t readily available without the original documentation, the NC-6 is known for its reliability and user-friendly interface. It’s compatible with Brivis StarPro SP and BX5 models, enabling advanced zoning capabilities. The controller’s functionality is managed through 13 numbered buttons, each controlling specific system parameters.
Older NC-6 units, like newer models, allow for precise temperature adjustments and fan speed control. Understanding the button functions and display interpretations, as outlined in the owner’s manual, is key to maximizing its potential. The NC-6 is a robust solution for managing complex heating and cooling needs within a Brivis system;
Brivis Profiler Models: P23 to P64 – Overview
Brivis Profiler models, ranging from P23 to P64, represent a diverse line of evaporative coolers designed for various cooling capacities and home sizes. These units, often controlled by the Brivis Networker NC-6 or similar controllers, provide efficient and cost-effective cooling solutions. Understanding the interaction between the Profiler unit and its associated wall controller is crucial for optimal performance.
The Profiler series offers a range of features, including multiple fan speeds and adjustable water distribution, all manageable through the controller’s interface. Older models may have slightly different control schemes compared to newer iterations, emphasizing the importance of referencing the specific owner’s manual for the P23, P33, P43, P53, or P63 unit.
Proper zoning integration, when available, further enhances the efficiency of Profiler models. The controller allows users to direct airflow to specific zones, maximizing comfort and minimizing energy consumption. Serial numbers, vital for identifying the specific model and accessing relevant documentation, are typically located on the unit itself.
Brivis Promina Models: P24 to P64 – Detailed Look
Brivis Promina models, spanning from P24 to P64, represent a premium range of evaporative coolers known for their advanced features and enhanced performance. Like the Profiler series, these units are frequently managed via Brivis Networker controllers, offering precise control over cooling operations. A detailed understanding of the controller’s functionality is essential for maximizing the benefits of a Promina system.
Promina models often incorporate features like automatic drain-down and advanced water management systems, all configurable through the wall-mounted controller. Older units may exhibit variations in button layouts and display information, highlighting the need for a model-specific owner’s manual (P24, P25, P26, P34, P35, P36, P44, P45, P46, P54, P55, P56, P64).
Compatibility with zoning systems allows for targeted cooling, improving comfort and energy efficiency. Identifying the correct serial number is crucial for accessing specific documentation and troubleshooting guides. The controller’s programming options enable customization to suit individual preferences and environmental conditions.
Remote Controller Specifications (General)
Generally, Brivis remote controllers, integral to systems like the Networker NC-6 and used with Profiler and Promina models, operate on a rated voltage of 24V. These controllers feature 13 numbered buttons facilitating comprehensive system control, including power, fan speed, and mode selection. Signal receiving range varies depending on the model and environmental factors, but typically extends several meters.

Older controllers may lack modern features like digital displays or advanced programming options, relying instead on simpler indicator lights and manual adjustments. Operating environments should be within specified temperature and humidity ranges to ensure reliable performance. Proper battery installation is crucial for functionality, and regular battery replacement is recommended.
Understanding the controller’s specifications is vital for troubleshooting and ensuring compatibility with existing Brivis systems. Part codes, such as BSB022890, aid in identifying specific controller models and accessing relevant documentation. These controllers are designed for indoor use only, protecting them from the elements.
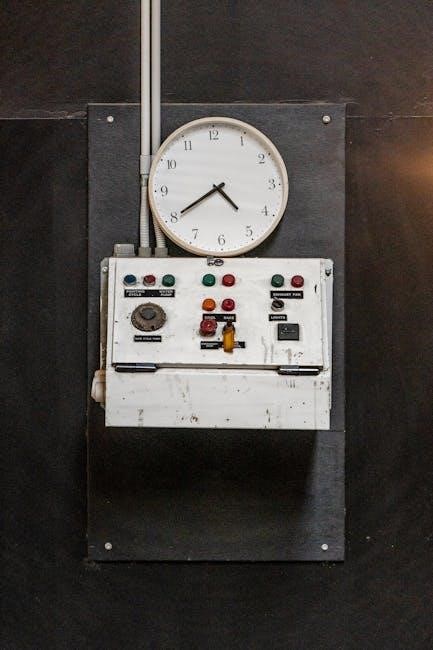
Button Functions & Display Interpretation
Brivis remote controllers, particularly older models, utilize 13 numbered buttons for system operation. Buttons 1-12 typically control core functions: power, fan speed (low, medium, high), mode selection (cool, heat, auto), and temperature adjustment. Button 13 often serves as a reset or function override. Interpreting the display is key; older units may use simple LED indicators for mode and status, while newer ones feature digital readouts.
Understanding the display’s symbols is crucial. A flashing light might indicate a fault or a specific operating condition. The temperature display shows the setpoint, and indicators confirm active modes like cooling or heating. The controller interacts with the electronic board (N-E6) to manage the system.
Referencing the owner’s manual is essential for precise function definitions, as button assignments can vary slightly between Profiler and Promina models. Correct interpretation ensures optimal comfort and efficient operation of your Brivis system.
Power Control & Basic Operation
Brivis wall controllers manage power to the evaporative cooler or ducted heating/cooling system. The primary power button, usually numbered ‘1’ on older models, initiates system operation. Ensure the main power supply to the unit is active before using the controller. Basic operation involves setting the desired temperature and fan speed using the numbered buttons. The controller sends signals to the electronic board (N-E6) to activate the appropriate components.

Older controllers may lack advanced features like programmable timers. Operation is generally straightforward: power on, adjust temperature, and select fan speed. The display will indicate the current operating mode – cooling, heating, or auto. Proper power control prevents unnecessary energy consumption and extends the lifespan of the system.
Always consult the owner’s manual for specific instructions related to your Profiler or Promina model. Understanding these basics ensures reliable and efficient operation of your Brivis climate control system.
Zoning System Integration with Brivis Controllers
Brivis zoning systems, often found with StarPro SP and BX5 models, allow independent temperature control in different areas of a home. Older wall controllers integrate with these zones through dedicated zone control panels. The controller sends signals to the panel, which then opens or closes dampers to direct airflow to specific zones.
Integration typically involves wiring the controller to the zone control panel. The controller acts as a central command unit, enabling users to adjust temperatures in each zone individually. A complete heating and cooling system includes a zone control system as a vital component. The minimum number of wall switches required depends on the zoning configuration.
While older controllers may have limited zoning functionality compared to newer models, they still provide basic zone control capabilities. Proper setup and wiring are crucial for optimal performance. Refer to the zoning system’s documentation for detailed integration instructions.
Compatibility with Brivis StarPro SP & BX5 Models
Brivis StarPro SP and BX5 models frequently incorporate zoning capabilities, enhancing comfort and energy efficiency. Older wall controllers demonstrate varying degrees of compatibility with these systems. Generally, controllers designed before the widespread adoption of digital protocols may require specific interface modules for seamless integration.
Compatibility hinges on the controller’s ability to communicate with the StarPro or BX5’s control board. Older analog controllers might necessitate an adapter to translate signals. Digital controllers, even older ones, often offer better compatibility, though firmware updates may be needed to ensure full functionality. The Networker controller, even older versions, often provides a reliable connection.

When upgrading or replacing a wall controller, verifying compatibility with the specific StarPro or BX5 model is crucial. Consult the Brivis documentation or a qualified technician to confirm proper operation and avoid potential issues. Proper wiring and configuration are essential for optimal performance.
Brivis Electronic Board Control N-E6 (No Switch) – Part B021191
The Brivis Electronic Board Control N-E6 (Part B021191) serves as a central component in many older Brivis heating and cooling systems. This board, characterized by its “no switch” configuration, manages system functions without direct manual switches, relying instead on signals from wall controllers and sensors.
Its primary role is to interpret commands from the wall controller – whether a Profiler, Promina, or Networker model – and translate them into actions for the system’s various components, including the fan, compressor, and zone dampers. Troubleshooting often involves checking the board for correct voltage and signal reception.
When replacing the N-E6, ensuring the correct part number (B021191) is vital. Incorrect boards can lead to system malfunctions. Compatibility with older wall controllers is generally good, but verifying wiring connections is essential. Proper grounding and secure connections are critical for reliable operation and safety.
Troubleshooting Common Controller Issues
Common issues with older Brivis wall controllers often stem from battery depletion in remote units, leading to unresponsive buttons or display problems. Verify battery functionality first. Intermittent operation can indicate loose wiring connections at the controller itself, the electronic board (N-E6), or within the system’s wiring harness. Inspect these connections carefully.
If the controller displays error codes, consult the original installation manual for interpretation. A lack of response from the system after entering commands suggests a potential fault with the electronic control board or a communication breakdown between the controller and the board.
For unresponsive systems, check the main power supply and circuit breakers. Ensure the controller is correctly programmed for the specific Brivis model (Profiler, Promina, or Networker). If problems persist, professional servicing is recommended, as internal board repairs require specialized knowledge and tools.
Controller Programming & Settings Adjustment

Programming older Brivis wall controllers, like the Networker NC-6, typically involves a sequence of button presses to access various settings. These include fan speed control, temperature adjustments, and zoning configurations. Refer to the original owner’s manual for the precise button combinations, as they vary between Profiler and Promina models (P23-P64).
Settings adjustments often include setting the current time and date, configuring the operating mode (manual or auto), and defining temperature setpoints for heating and cooling. Zoning systems require programming each zone’s desired temperature and schedule. Ensure correct wiring to the electronic board (N-E6, part B021191) for proper zone control.
Carefully review the manual to understand the implications of each setting. Incorrect programming can lead to inefficient operation or system malfunctions. Remember to save any changes made to the controller’s memory before exiting the programming mode.
Manual vs. Auto Mode Operation
Older Brivis wall controllers, such as those used with Profiler (P23-P64) and Promina models, offer both manual and automatic operating modes. Manual mode allows direct user control over fan speed and temperature settings, overriding any programmed schedules. This is ideal for immediate comfort adjustments.
Auto mode, however, leverages pre-programmed settings and schedules to maintain a consistent temperature throughout the day. This mode is particularly effective when integrated with zoning systems, optimizing energy efficiency by only conditioning occupied areas. The Networker NC-6 controller facilitates switching between these modes.
Understanding the difference is crucial for efficient operation. In auto mode, the controller manages the system based on the programmed parameters, while manual mode grants the user complete control. Proper utilization of both modes, alongside correct electronic board (N-E6, B021191) functionality, ensures optimal comfort and energy savings.
Wiring Diagrams & Installation Considerations
Installing or replacing an older Brivis wall controller requires careful attention to wiring diagrams. Typically, controllers like the Networker NC-6 connect via low-voltage wiring to the central control board (N-E6, B021191). Correct polarity is essential for proper operation; incorrect wiring can damage the controller or the system.
Installation considerations include ensuring adequate wire gauge and secure connections. When integrating with zoning systems, verify compatibility and proper zone wiring. For Profiler and Promina models, confirm the controller’s voltage matches the system’s requirements.
Always disconnect power before working with electrical wiring. If unfamiliar with electrical work, consult a qualified technician. Proper grounding is crucial for safety. Refer to the specific controller’s manual for detailed wiring schematics and installation instructions. Incorrect installation voids warranties and can create hazardous conditions.
Evaporative Cooler Control with Brivis Systems
Brivis systems can effectively control evaporative coolers, integrating them into a comprehensive climate management solution. Older wall controllers, while potentially lacking advanced features, still provide basic on/off control and speed adjustments for the cooler. The connection typically involves wiring the cooler’s control circuit to the Brivis control board (N-E6).
When integrating an evaporative cooler, ensure the controller’s output voltage is compatible with the cooler’s input requirements. Some systems utilize a dedicated evaporative cooler output on the control board. Proper wiring is crucial to prevent damage to either the controller or the cooler.
Consider the cooler’s serial number when troubleshooting. Fasco motors (like the 80855BNVA-A12) are commonly used in evaporative coolers and require appropriate electrical connections. Always consult the cooler’s manual and the Brivis system documentation for specific wiring diagrams and safety precautions.
Fasco Motor Integration (80855BNVA-A12)
The Fasco motor, model 80855BNVA-A12 (315W, 4-pole, 1400RPM), is frequently found within Brivis evaporative cooler systems. Integrating this motor with older Brivis wall controllers requires careful attention to wiring and voltage compatibility. The controller’s output must match the motor’s voltage requirements to prevent damage or malfunction.
Typically, the motor connects to the Brivis control board (N-E6) via a relay. The controller sends a signal to the relay, which then activates the motor. Ensure the relay is appropriately rated for the motor’s current draw. Incorrect wiring can lead to motor failure or controller issues.

When troubleshooting, verify the motor’s power supply and control signal. Check for loose connections or damaged wiring. Refer to the Brivis system’s wiring diagrams and the Fasco motor’s specifications for detailed instructions. Proper installation and maintenance are vital for optimal performance.
Serial Number Identification & Part Codes (e.g., BSB022890)
Accurate identification of Brivis wall controller components relies heavily on serial numbers and part codes. Codes like BSB022890 are crucial for sourcing replacement parts and accessing specific documentation. These identifiers pinpoint the exact model and revision of the controller or associated components.
Locating the serial number typically involves inspecting the controller’s casing or the electronic board itself (N-E6). The number is often printed on a label or directly etched onto the plastic. Maintaining a record of these numbers is essential for future repairs or upgrades.
Brivis utilizes various part codes for different components, including the Networker NC-6 and thermostats (GDH Manual). When ordering replacements, always provide the complete part code to ensure compatibility. Incorrect parts can lead to system malfunctions. Referencing the original manual or contacting a Brivis dealer can aid in accurate identification.